A small bathroom doesn't mean you have to compromise on style. In fact, with the right approach, a compact space can become a design jewel box, a testament to clever planning and creative flair. The secret often lies in the tiles. They are the canvas upon which the entire room is built, capable of manipulating light, creating illusions of space, and setting a luxurious tone.
Forget the outdated notion that small tiles are the only option for small rooms. Modern design principles have turned this idea on its head, revealing that scale, pattern, and finish are far more influential factors in maximising perceived space. In this guide, we'll explore seven transformative tile ideas for small bathroom spaces that prove even the most modest room can feel open, airy, and impeccably styled.
From the expansive effect of large format tiles to the height-enhancing magic of vertical layouts, these concepts are designed to make the most of every square centimetre. Get ready to rethink your small bathroom's potential and discover how strategic tiling can make all the difference, creating a functional and beautiful sanctuary.
1. Large Format Tiles
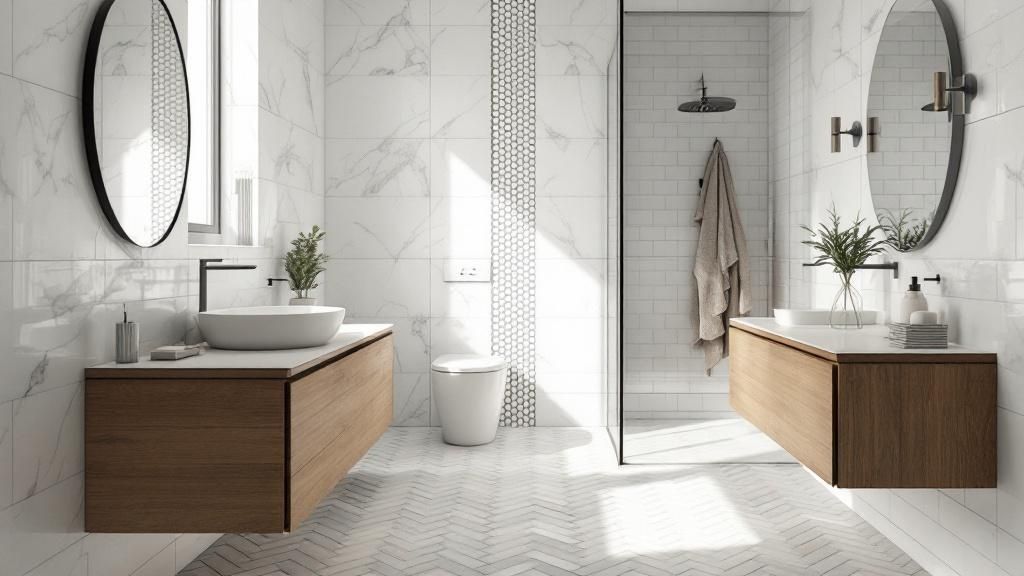
It may seem counterintuitive, but one of the most effective tile ideas for a small bathroom involves going big. Large format tiles, typically defined as having at least one side longer than 38cm (about 15 inches), create a powerful illusion of spaciousness. By minimising the number of grout lines, these oversized tiles trick the eye into seeing a less cluttered, more continuous surface. This visual simplicity makes both walls and floors appear larger and more open than they truly are.

This approach moves away from busy, grid-like patterns that can make a small room feel cramped. Instead, it creates a clean, serene backdrop reminiscent of luxury hotel bathrooms or minimalist spa retreats. The uninterrupted flow of a large tile surface helps to unify the space, reducing visual noise and enhancing the feeling of calm. To further explore how to maximise limited areas, you can discover more small space decorating ideas on sprucecollective.co.uk.
Why It Works for Small Bathrooms
The magic lies in scale and perception. Fewer grout lines mean less visual interruption, which the brain interprets as a larger, more expansive area. This technique is particularly effective when the same large tile is used on both the floor and the walls, creating a seamless, wraparound effect that blurs the room's boundaries.
How to Implement This Idea
Achieving a flawless finish with large format tiles requires careful planning and execution. Keep these practical tips in mind:
- Minimise Grout Lines: Choose rectified tiles, which have been precisely cut after firing to ensure their edges are perfectly straight. This allows for extremely thin grout lines (as little as 1.5mm), maximising the continuous look.
- Create Height: To make the ceiling feel higher, install rectangular tiles like 30x60cm or 60x120cm vertically on the walls. This orientation draws the eye upwards, adding a sense of loftiness to the space.
- Plan the Layout: Before a single tile is laid, map out the entire layout. The goal is to minimise awkward cuts and ensure that any cut tiles are placed in the least conspicuous areas, such as behind the door or under a vanity unit.
- Ensure a Level Surface: Use a tile levelling system during installation. These clips and wedges prevent "lippage," where one tile edge sits higher than its neighbour, ensuring a perfectly flat and professional-looking surface.
2. Vertical Subway Tiles
A modern twist on a timeless classic, installing subway tiles vertically is a clever design trick to enhance a small bathroom. Instead of the traditional horizontal, brick-like layout, this method involves orienting rectangular tiles upwards. This simple shift in direction draws the eye skyward, creating a powerful illusion of higher ceilings and adding a sense of grandeur and openness to even the most compact of spaces.

This vertical arrangement feels fresh and contemporary, offering a sophisticated alternative to the familiar horizontal pattern. It introduces clean, linear movement that can make a room feel more dynamic and less constrained. The look is versatile, fitting perfectly in minimalist modern bathrooms, boutique hotel-style powder rooms, or even as a feature wall in a more traditional setting, proving that innovative tile ideas for a small bathroom don't require expensive or unusual materials.
Why It Works for Small Bathrooms
The effectiveness of this technique lies in its ability to manipulate visual perception. The strong vertical lines guide the gaze upwards, away from the limited floor space, making the ceiling feel much taller than it actually is. This creates a sense of airiness and vertical volume, which is crucial for preventing a small bathroom from feeling cramped or claustrophobic.
How to Implement This Idea
Executing a vertical tile layout requires precision to achieve a polished, high-end finish. Follow these practical tips for a successful installation:
- Select a Contrasting Grout: While thin grout lines are still key, using a grout colour that contrasts with the tile can accentuate the vertical lines. For example, a dark grey grout with white tiles will make the pattern pop and heighten the lengthening effect.
- Create a Focal Point: Consider using vertical tiles on a single accent wall, such as the wall behind the vanity or inside the shower enclosure. This adds visual interest without overwhelming the entire space.
- Plan Your Centre Line: To ensure a symmetrical and balanced appearance, always start your installation from the centre of the wall and work your way outwards. This prevents having awkward, thin slivers of tile at the most visible edges.
- Balance with Horizontal Elements: To avoid making the room feel too narrow, introduce horizontal elements to balance the design. A floating vanity, a long mirror, or shelving can provide the necessary horizontal lines to ground the space.
3. Light and Neutral Colour Palette
One of the most classic and effective tile ideas for a small bathroom is to embrace a light and neutral colour scheme. Hues such as brilliant white, soft cream, light grey, and warm beige are powerful tools for creating an illusion of space. These colours are highly reflective, bouncing both natural and artificial light around the room. This simple act of light amplification makes the entire area feel brighter, more open, and significantly larger than its actual dimensions.
This approach, popularised by the clean aesthetics of Scandinavian design and the serene atmosphere of the spa industry, provides a calm, uncluttered foundation. It avoids overwhelming a compact space with dark or busy patterns, instead fostering a tranquil, airy ambience. A neutral palette also offers timeless appeal and incredible versatility, allowing you to easily update the room's look with different accessories and textiles over time. For more tips on refreshing your space without breaking the bank, explore our guide to affordable interior design.
Why It Works for Small Bathrooms
The principle behind this idea is light reflection. Dark colours absorb light, making a space feel enclosed and smaller, while light colours do the opposite. By maximising the amount of light that bounces off the surfaces, you effectively push the walls outwards visually. This creates an expansive, breathable atmosphere that counteracts any feelings of being cramped or confined.
How to Implement This Idea
Using a light palette doesn't have to mean boring. Here’s how to implement this idea with sophistication and style:
- Introduce Subtle Texture: To prevent a white or beige space from feeling flat or clinical, choose tiles with a subtle texture or finish. A gentle wave, a matte surface, or a handmade-look ceramic adds depth and character without sacrificing brightness.
- Vary the Tones: Use slightly different shades of the same neutral colour to add visual interest. For instance, pair off-white wall tiles with a slightly darker greige floor tile to create a gentle, layered contrast that grounds the space.
- Consider Grout Colour: While matching grout creates a seamless look, a slightly darker grout (like a light grey with white tiles) can add subtle definition and is far more practical for maintenance.
- Add Warmth with Lighting: Ensure your lighting choices complement the neutral tiles. Warm-toned LED bulbs will prevent an all-white or grey bathroom from feeling cold, casting a welcoming, cosy glow instead.
4. Diagonal or Herringbone Pattern
One of the most creative tile ideas for a small bathroom is to break away from the standard grid layout. Introducing a diagonal or herringbone pattern creates dynamic visual movement that tricks the eye, making the space feel larger and more sophisticated. A diagonal layout, set at a 45-degree angle, leads the eye across the longest possible line of the room, while a herringbone pattern’s V-shaped design adds texture and directional flow.

These layouts inject energy and elegance into a compact area, preventing it from feeling static or boxed-in. Instead of emphasising the room's restrictive dimensions, the angled lines create an illusion of width and length. This technique is a firm favourite in boutique hotels and high-end designs, proving that intricate patterns can work wonders in confined spaces. These sophisticated patterns are a key feature in many modern designs, and you can see how they align with current styles by exploring the latest interior design trends for 2024 on sprucecollective.co.uk.
Why It Works for Small Bathrooms
The effectiveness of these patterns lies in their ability to manipulate perception. The diagonal lines draw the gaze from corner to corner rather than from wall to wall, which makes the floor plane appear more expansive. The zigzag of a herringbone pattern creates a sense of motion that keeps the eye moving, which prevents the space from feeling cramped and adds a layer of refined visual interest.
How to Implement This Idea
A successful pattern installation requires precision and planning. Follow these tips to get the look just right:
- Plan from the Centre: Begin your layout from the centre of the room and work outwards. This ensures the pattern is balanced and symmetrical, creating a professional and polished finish.
- Use the Right Spacers: For a diagonal layout, use T-shaped or cross-shaped tile spacers designed specifically for this application to maintain consistent grout lines and perfect angles.
- Account for Extra Material: These patterns require more intricate cuts, especially around the edges and fixtures. Order 15-20% extra tiles to account for the additional waste generated during installation.
- Consider Pattern Scale: In a very small bathroom, a smaller-scale herringbone pattern using metro tiles can add detail without overwhelming the space, while a larger diagonal tile can enhance the feeling of openness.
5. Floor-to-Ceiling Tiling
One of the most dramatic and effective tile ideas for a small bathroom is to take the tiling from the floor all the way up to the ceiling. This technique creates an unbroken, continuous surface that draws the eye upward, giving a powerful illusion of height and volume. By eliminating the visual stop that a painted wall or border creates, the entire room feels more cohesive, expansive, and complete.
This method wraps the room in a single material, a look popularised by luxury hotels and high-end spas to create a seamless, sophisticated sanctuary. The result is a clean, uncluttered aesthetic that feels both intentional and grand, turning a purely functional space into a statement feature. This approach also provides an opportunity to integrate custom features, and you can explore more about clever storage ideas to build in while you renovate on sprucecollective.co.uk.
Why It Works for Small Bathrooms
The effectiveness of floor-to-ceiling tiling lies in creating strong vertical lines and a uniform backdrop. This continuity eliminates horizontal breaks that can make a room feel segmented and smaller. The eye travels smoothly from the floor to the ceiling, perceiving the space as taller and more open than its actual dimensions, a crucial trick for compact bathrooms.
How to Implement This Idea
Executing full-height tiling requires precision to achieve a polished, high-end finish. Consider these practical tips for a successful installation:
- Emphasise Verticality: While any tile can be used, installing rectangular tiles in a vertical orientation will compound the height-enhancing effect. This layout actively guides the eye upwards, maximising the illusion of a taller ceiling.
- Plan Penetrations: Carefully map out the locations for all plumbing fixtures, light switches, and electrical outlets before tiling begins. Precise cuts are essential for a clean finish, so measure twice and ensure your tiler understands the complete layout.
- Use Consistent Grout: Choose a grout colour that closely matches your tile to create a seamless, monolithic appearance. This minimises the grid effect and enhances the feeling of a single, continuous surface.
- Consider Lighting: Full-height tiling can sometimes feel imposing. Use accent lighting, such as wall sconces or LED strips in niches, to add warmth, highlight the tile's texture, and create depth within the space.
6. Mosaic Accent Walls
Creating a stunning focal point without overwhelming the room is one of the smartest tile ideas for a small bathroom, and mosaic accent walls achieve this perfectly. Mosaics, composed of tiny tiles often 2.5cm (1 inch) square or smaller, introduce intricate detail, texture, and a splash of personality. By dedicating just one wall or a specific area to this detailed design, you can make a powerful style statement while keeping the rest of the space simple and uncluttered.
This technique draws inspiration from centuries of artistry, from Roman baths to modern boutique hotels, allowing for immense creativity. Whether it’s a shimmering glass mosaic behind the vanity or a natural stone design in a shower niche, the effect is one of bespoke luxury. It adds a layer of visual depth that prevents the small bathroom from feeling plain or one-dimensional, transforming a functional area into a feature.
Why It Works for Small Bathrooms
The power of a mosaic accent wall lies in its ability to command attention in a controlled way. It creates a 'wow' factor that distracts from the room's limited footprint, drawing the eye to a single, beautifully crafted surface. This prevents the space from feeling busy, as the surrounding walls remain simple, enhancing the overall sense of spaciousness.
How to Implement This Idea
Using mosaics effectively requires a balanced and strategic approach. Keep these tips in mind to get the best results:
- Choose a Focal Point: Select a single, impactful area for your mosaic. The wall behind the vanity, the back wall of a shower enclosure, or the space inside a recessed niche are all excellent candidates.
- Balance with Simplicity: To avoid visual chaos, pair your detailed mosaic wall with larger, simpler tiles in neutral colours on the remaining walls and floor. This allows the accent to truly shine without overwhelming the senses.
- Consider Grout Colour: The grout colour can dramatically alter the final look. A contrasting grout will highlight the shape of each individual tile, creating a more pronounced pattern, while a matching grout will create a more subtle, blended texture.
- Think About Materials: Mosaics come in a vast range of materials, including glass, ceramic, natural stone, and even metal. Glass mosaics can reflect light and add sparkle, making the room feel brighter, while natural stone adds an earthy, spa-like tranquillity.
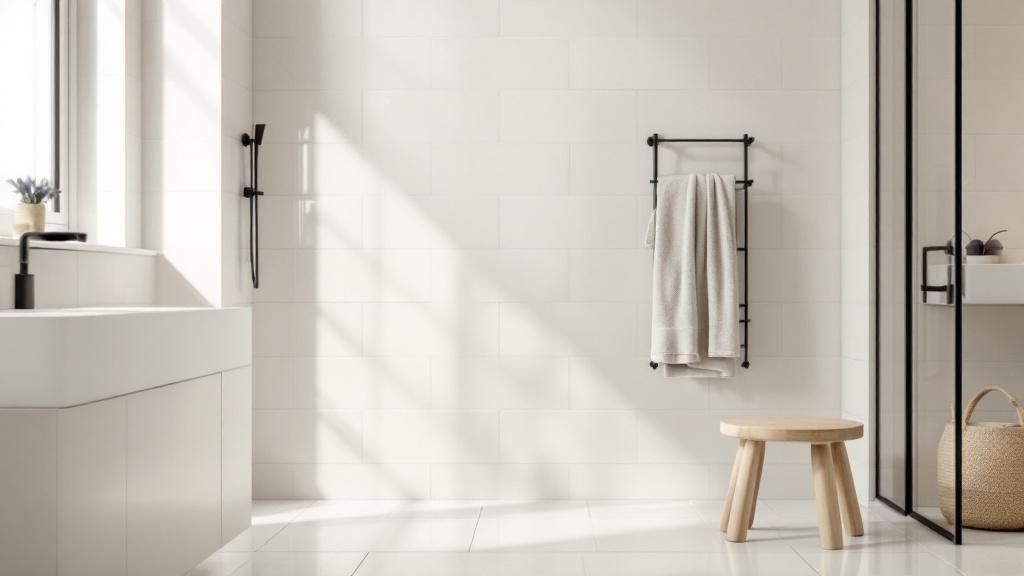
7. Glossy or Reflective Finishes
One of the most effective tile ideas for a small bathroom involves harnessing the power of light. Glossy and reflective tile finishes act like mirrors, bouncing light around the room to create a brighter, more spacious feeling environment. These high-sheen surfaces capture and multiply both natural and artificial light sources, creating depth through reflection and making compact spaces feel significantly more open and airy.
This approach brings a touch of glamour and sophistication, reminiscent of Art Deco design or contemporary luxury hotel suites. The luminous quality of a glossy surface can turn a purely functional room into a radiant retreat. By amplifying the available light, these tiles make the bathroom feel cleaner, more vibrant, and less confined, proving that the right finish can be as impactful as the tile's colour or size.
Why It Works for Small Bathrooms
The principle is simple: light creates the illusion of space. Glossy surfaces reflect their surroundings, which tricks the eye into perceiving more depth than actually exists. This effect makes walls recede and ceilings feel higher, combatting the enclosed feeling that often plagues smaller bathrooms. Even a subtle sheen can make a dramatic difference in how expansive the room feels.
How to Implement This Idea
Using reflective tiles successfully requires a thoughtful approach to balance and functionality. Consider these key points:
- Soften the Lighting: High-gloss tiles can create glare under harsh, direct lighting. Opt for layered, diffused light sources like wall sconces or backlit mirrors to create a soft, inviting glow. For more guidance, explore these tips for choosing the best bathroom lighting on sprucecollective.co.uk.
- Balance with Matte Textures: To avoid an overly clinical or dazzling effect, pair glossy wall tiles with matte or textured elements. Consider a matte finish for floor tiles, a wooden vanity, or plush, absorbent textiles like towels and bathmats.
- Prioritise Floor Safety: While beautiful, high-gloss tiles can become slippery when wet. Look for options with a slip-resistant glaze or a higher slip-resistance rating if using them on the floor, or reserve the glossy finish for wall applications only.
- Keep it Clean: Reflective surfaces show water spots and fingerprints more readily than matte ones. Regular cleaning with a soft cloth and a suitable cleaner will be necessary to maintain their brilliant, light-bouncing appearance.
7 Tile Ideas Comparison Guide
Your Blueprint for a Bigger, Bolder Bathroom
Navigating the design of a compact bathroom can feel like a complex puzzle, but as we have explored, the solution lies in strategic tile selection. Your bathroom's small footprint is not a limitation; it is a canvas for clever, impactful design. The right tile ideas for a small bathroom can fundamentally alter the perception of space, light, and luxury, transforming a cramped room into an airy, inviting retreat.
The key takeaway from these diverse strategies is intentionality. Every decision, from tile size to finish, plays a crucial role in the final aesthetic. By understanding the principles behind each idea, you can now craft a space that feels both personal and spatially optimised.
Key Principles for Small Bathroom Success
Let’s recap the core concepts that empower you to maximise your space:
- Manipulate Perception: Use large format tiles with minimal grout lines to create an unbroken, expansive surface. Similarly, laying tiles like classic subways in a vertical orientation draws the eye upward, giving the illusion of a higher ceiling.
- Amplify Light: A light and neutral colour palette is your greatest ally. Whites, soft greys, and pale beiges act as a natural reflector, making the room feel brighter and more open. Combining this with a glossy or reflective tile finish doubles down on this effect, bouncing light around the space.
- Create Dynamic Interest: Small spaces do not have to be boring. Introducing a diagonal or herringbone pattern on the floor adds movement and visual interest, making the floor plan appear wider than it is. A well-placed mosaic accent wall can also serve as a stunning focal point without overwhelming the room.
- Embrace Continuity: Tiling from floor to ceiling is a powerful technique. It eliminates visual breaks, creating a seamless, unified look that enhances the sense of height and cohesion, making the entire room feel larger.
Your Next Steps to a Transformed Space
Now that you are armed with these powerful tile ideas for a small bathroom, the next step is to start planning. Begin by assessing your own space. Which of these strategies resonates most with your personal style and the specific challenges of your bathroom? Perhaps you will combine the light-amplifying power of a neutral colour scheme with the dynamic energy of a herringbone floor. Or maybe the bold, seamless look of floor-to-ceiling large format tiles is the perfect solution for your home.
The journey to a more beautiful home is filled with inspiration and creativity. A small bathroom is not a design dead-end; it is an invitation to be resourceful, innovative, and bold. By applying these focused tile strategies, you can unlock its hidden potential and create a stylish sanctuary you will love for years to come.